Written By Kris Brown.
Posted on April 17th, 2019.
Tagged with WAC Forestry Research, Forestry BMPs.
Logger Tom Wormell shared his expertise in skidder bridge construction during a Trained Logger Certification course in Saugerties, NY.

Tom Wormell really knows his stuff when it comes to building skidder bridges. For the last year or so, he’s been supplying the WAC Forestry Program with bridges that WAC loans free of charge to loggers working on timber harvests in the NYC Watershed. As such, he’s got the construction process down to a science.
These portable bridges protect water quality by keeping forestry machines out of stream channels during skidding operations. They can also be used as mats to protect stream crossing approaches from rutting and erosion.
When we arrived at his workshop in Saugerties, NY, the wood beams (aka cants) needed to make two 20-ft skidder bridges were laid out neatly on steel I-beams. Using a portable sawmill, Tom produced the oak and hemlock cants that would form the bridge panels. All we needed to do was drill holes in the cants and use threaded steel rods, nuts, and washers to tighten them together.
Bridge cants laid out in preparation for construction. Tom used alternating pin oak (8”x6”x20’) and hemlock (6”x6”x20’) cants for each panel.
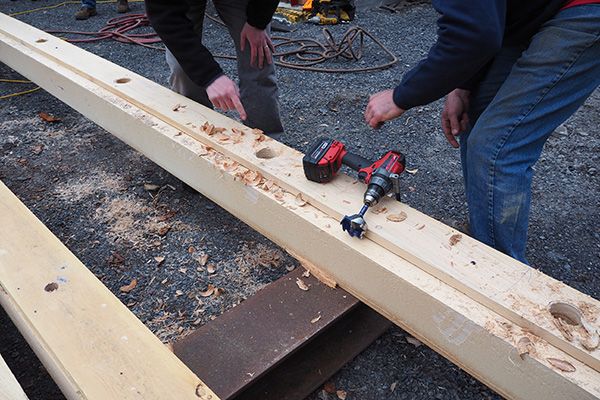
It’s difficult to feed the rods through nine cants if the holes don’t line up. To make sure they do, Tom has a template board that marks where to drill and a drill bit guide (jig) to ensure straight holes through the 6 to 8-inch thick cants.
Tom Wormell (foreground) watches as logger Roger Gee Sr. drills the first few holes of the day.
The outer cants on each panel had countersink holes drilled in them that accommodated the washer and nut so they were flush with the outer edge of the cant.
Once we had holes drilled in several cants, we began to feed the rods through. This involved putting a washer and nut on the end of the rod and then beating it through the first few cants with a sledge hammer. Tom noted that you want to damage the threads so the nut stays on this end of the rod. During final tightening with a power driver, the rod will then spin through all of the cants and tighten at the nut on the opposite side of the panel (see photos below).
Logger Paul Anthony Krickhahn banged the rods through the cants with a sledge hammer. Note that at times it was necessary to use a heavy bar to lift the cants so the holes lined up.
This bridge panel is ready for final tightening. Paul Anthony Krickhan (Left) runs the power driver, while Kurt Davis (Right) holds the opposite nut steady with a wrench. Also note that two cants have been cut on each end to expose the rods. This allows a cable-skidder to hook on and drag the panels into place.
The day was a success all-around. A dozen loggers attended the workshop and earned Trained Logger Certification (TLC) credits. In seven hours (including a hearty lunch) we assembled six panels measuring 4.5-ft wide x 20-ft long x 0.75-ft thick. Three panels laid side-by-side makes a bridge wide enough for a skidder. Not bad for a day’s work. However, the group was convinced that we could do nine panels/day if we beefed up Tom’s drill bit guide to allow three or four holes to be drilled per setup. Leave it to the experts to identify a bottleneck in the process and attempt to increase its capacity.
To read more about portable bridges, check out the following:
Portable Skidder Bridge Installation at Siuslaw Model Forest
Building Skidder Bridges for the WAC Bridge Loan Program
Check out the links below to learn more about skidder bridge construction and use, protecting streams during your woodlot harvest, logger training workshops, and WAC’s portable bridge loan program:
Additional resources
- 3-Panel 20-Foot Portable Skidder Bridge Design and Specifications
- Portable Skidder Bridge video from VT Dept. of Forests, Parks, and Recreation
- Tips for Protecting Your Trails, Water, and Wildlife during Logging
- WAC Supports Trained Logger Certification
- WAC BMP Program (including portable bridge loan)


